
HTTP/2 服务器推送 - Node.js 服务器端推送
Node.js 8.4.0 版本发布的同时,开始实验性的支持 HTTP/2 ,当然了,截止于当前的最新版本 v10.8.0 ,它还处于实验性的支持阶段。如果我们想要在 Node.js 中使用 HTTP/2 ,不得不使用 --expose-http2 标志启用它
其实前面几个章节,我们通过讲解 PHP 中的 HTTP/2 支持和 Nginx 中的 HTTP/2 支持,已经大概了解了 HTTP/2 服务器端推送是怎么回事了。
本文,我不得不在再次重复的介绍 HTTP/2 服务器推送的最重要方面,并创建一个小型 Node.js 应用程序,并从中获得更多的灵感。
关于 HTTP/2
HTTP/2 的主要目标是通过启用完整的多路复用请求和响应来减少延迟,通过有效压缩 HTTP 头字段来最小化协议开销,并添加对请求优先级和服务器推送的支持
想要获得更多有关 HTTP/2 的知识,可以访问 Google 的 HTTP/2 简介 ( 被墙,可能需要楼梯 )
HTTP/2 服务器推送
HTTP/2 服务器推送可以在客户端 ( 通常是浏览器 ) 请求某些资源之前就把资源发送给它们。
在我们继续讲解 HTTP/2 服务器推送之前,我们先来看看 HTTP/1.1 中是如何处理这些资源的。
在 HTTP/1.1 中,采用的是请求响应模式,客户端向服务器发送请求,服务器回复所请求的内容。通常情况下,一个 HTML 文件会链接和使用到很多的资源文件 ( .js 、.css 等 ) 。当浏览器开始处理这个起始的 HTML 文件时,它会解析这些链接并发出单独的请求来获取它们
它们的处理和获取过长一般如下图所示,请特别注意时间表上的独立请求以及这些请求的发起者
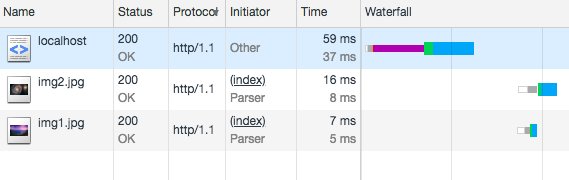
这就是 HTTP/1 的工作原理,这就是我们多年来开发应用程序的方式。
但,为什么现在改变它 ?
HTTP/1 工作的非常良好,但是,它有一个严重的问题,就是用户必须等待浏览器解析响应,发现资源链接和获取资源。这会延迟渲染并增加加载时间。
有一些其它的解决方法,如内联一些资源,但它也使初始响应更大,更慢、而且也不易缓存。
针对这个问题, HTTP/2 孕育而生了,这就是 HTTP/2 服务器推送功能的用武之地,因为服务器甚至可以在向浏览器提出要求之前将资源发送到浏览器
请看下面的图片,通过 HTTP/2 提供相同的网站。查看时间表和发起人。你可以看到 HTTP/2 多路复用减少了请求的数量,并且资源与初始请求一起立即发送
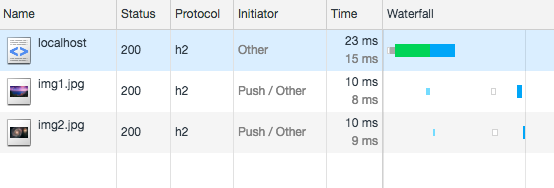
接下来,我们来讲讲如何在 Node.js 中启用 HTTP/2 服务器推送,加快客户端的加载时间
Node.js HTTP/2 服务器推送范例
使用 HTTP/2 服务器推送最让人兴奋的是,我们可以在响应 index.html 同时,将我们的两张图片同时发送给浏览器
我们需要使用内置的 http2 模块,但该模块有者和 https 模块类似的语法,我们可以用它来创建一个 HTTP/2 服务器
假设我们的范例所在目录为 /www/localhost/htdocs
要求
- Node.js > Node.js >= 8.4.0
- 使用
npm i mime命令在htdocs目录下安装mime模块
创建 https 证书
你可以使用我今天一早就发现的一键生成 https 证书命令来创建一个 localhost 下的 https 证书,链接地址如下
然后在 /www/localhost/htdocs 目录下新建一个子目录,并把刚刚创建的 localhost.key 和 localhost.crt 复制进去
完成这些工作后,目录结构如下
htdocs
└── ssl
    ├── localhost.crt
    ├── localhost.key
下载两张图片
上面示例图中使用的两张图片地址为
将这两张图片下载到 /www/localhost/htdocs 目录下,完成后,目录结果如下
htdocs/
├── img1.jpg
├── img2.jpg
└── ssl
    ├── localhost.crt
    ├── localhost.key
创建 index.html 文件
在 htdocs 目录下新建一个文件 index.html 并输入以下内容
<!DOCTYPE html>
<html>
<head>
    <meta charset="utf-8" />
    <style>
      h1 {color:red;}
      p {color:#111;}
      img {width:200px;}
    </style>
</head>
<body>
  <h1>你好,世界</h1>
  <p>简单教程,简单编程</p>
  <img src="/img1.jpg" />
  <p>简单教程,IT 编程入门第一站</p>
  <img src="/img2.jpg"/>
</body>
</html>
app.js
在 htdocs 目录下新建一个文件 app.js ,并输入以下内容
'use strict'

const fs = require('fs')
const path = require('path')
const http2 = require('http2')
const mime = require('mime')

function getFiles (baseDir) {
  const files = new Map()

  fs.readdirSync(baseDir).forEach((fileName) => {
    const filePath = path.join(baseDir, fileName)
    const fileDescriptor = fs.openSync(filePath, 'r')
    const stat = fs.fstatSync(fileDescriptor)
    const contentType = mime.getType(filePath)

    files.set(`/${fileName}`, {
      fileDescriptor,
      headers: {
        'content-length': stat.size,
        'last-modified': stat.mtime.toUTCString(),
        'content-type': contentType
      }
    })
  })

  return files
}


const { HTTP2_HEADER_PATH } = http2.constants
const PORT = process.env.PORT || 3000
const PUBLIC_PATH = path.join(__dirname)

const publicFiles = getFiles(PUBLIC_PATH)
const server = http2.createSecureServer({
  cert: fs.readFileSync(path.join(__dirname, 'ssl/localhost.crt')),
  key: fs.readFileSync(path.join(__dirname, 'ssl/localhost.key'))
}, onRequest)

// Push file
function push (stream, path) {
  const file = publicFiles.get(path)

  if (!file) {
    return
  }

  console.log(file);
  stream.pushStream({ [HTTP2_HEADER_PATH]: path }, (err, pushStream, headers) => {
    pushStream.respondWithFD(file.fileDescriptor, file.headers)
  })
}

// Request handler
function onRequest (req, res) {
  const reqPath = req.url === '/' ? '/index.html' : req.url
  const file = publicFiles.get(reqPath)

  // File not found
  if (!file) {
    res.statusCode = 404
    res.end()
    return
  }

  // Push with index.html
  if (reqPath === '/index.html') {
    push(res.stream, '/img1.jpg')
    push(res.stream, '/img2.jpg')
  }

  // Serve file
  res.stream.respondWithFD(file.fileDescriptor, file.headers)
}

server.listen(PORT, (err) => {
  if (err) {
    console.error(err)
    return
  }

  console.log(`Server listening on ${PORT}`)
})
做完这些后,目录结构如下
htdocs/
├── app.js
├── img1.jpg
├── img2.jpg
├── index.html
├── node_modules
│   └── mime
└── ssl
    ├── localhost.crt
    ├── localhost.key
运行
令人激动的地方来了,使用下面的命令运行我们的服务
$ node --expose-http2 app.js
(node:37636) ExperimentalWarning: The http2 module is an experimental API.
Server listening on 3000
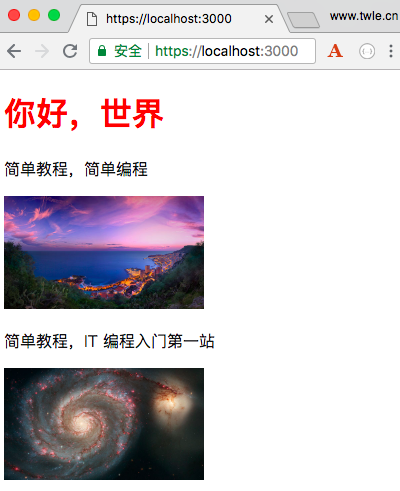
然后打开浏览器,访问 https://localhost:3000/ 输出结果如下
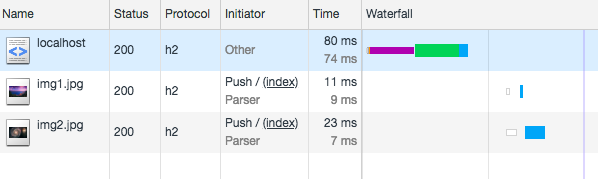
打开 「 开发者工具 」,切换到 「 网络 」 可以看到输出如下
