MongoDB 分片集群技术
分片 ( sharing) 是实现 MongoDB 集群的另一种方式,它可以满足日益增长的 MongoDB 数据量的需求
海量的数据使得单台 MongoDB 存储显得吃力且难以满足提供可接受的读写吞吐量
通过将数据分割到多台服务器就变得越来越重要,使得 MongoDB 数据库系统能存储和处理更多的数据
为什么使用分片
- 复制所有的写入操作到主节点
- 延迟的敏感数据会在主节点查询
- 单个副本集限制在12个节点
- 当请求量巨大时会出现内存不足
- 本地磁盘不足
- 垂直扩展价格昂贵
MongoDB分片
下图展示了 MongoDB 分片集群结构分布
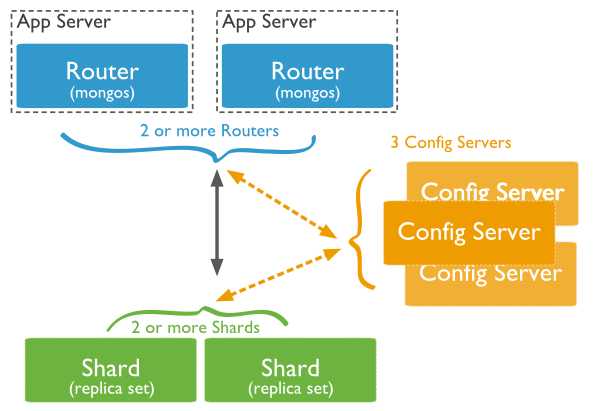
MongoDB 分片集群技术主要有三个组件
-
- Shard Server
- 用于存储实际的数据块
一个 shard server 角色可由几台机器组一个负载均衡承担,防止主机单点故障
-
- Config Server
- mongod 实例,存储了整个 Cluster Metadata,包括 chunk 信息
-
- Query Routers
- 前端路由
客户端由此接入,且让整个集群看上去像单一数据库
MongoDB 分片技术搭建范例
假设 MongoDB 分片集群结构组件如下所示
Shard Server
Shard Server 1:localhost:27020
Shard Server 2:localhost:27021
Shard Server 3:localhost:27022
Shard Server 4:localhost:27023
Config Server
Config Server :localhost:27100
Query Routers Server
Route Process:localhost:40000
MongoDB 分片集群搭建步骤
-
启动 Shard Server
[root@localhost ~]# mkdir -p /mnt/data/www/mongodb/shared/s0
[root@localhost ~]# mkdir -p /mnt/data/www/mongodb/shared/s1
[root@localhost ~]# mkdir -p /mnt/data/www/mongodb/shared/s2
[root@localhost ~]# mkdir -p /mnt/data/www/mongodb/shared/s3
[root@localhost ~]# mkdir -p /mnt/data/www/mongodb/shared/log
[root@localhost ~]#
[root@localhost ~]#
[root@localhost ~]# /usr/local/mongodb/bin/mongod --port 27020 --dbpath=/mnt/data/www/mongodb/shared/s0 --logpath=/mnt/data/www/mongodb/shared/log/s0.log --logappend --fork
[root@localhost ~]#
[root@localhost ~]# /usr/local/mongodb/bin/mongod --port 27021 --dbpath=/mnt/data/www/mongodb/shared/s1 --logpath=/mnt/data/www/mongodb/shared/log/s1.log --logappend --fork
[root@localhost ~]#
[root@localhost ~]# /usr/local/mongodb/bin/mongod --port 27022 --dbpath=/mnt/data/www/mongodb/shared/s2 --logpath=/mnt/data/www/mongodb/shared/log/s2.log --logappend --fork
[root@localhost ~]#
[root@localhost ~]# /usr/local/mongodb/bin/mongod --port 27023 --dbpath=/mnt/data/www/mongodb/shared/s3 --logpath=/mnt/data/www/mongodb/shared/log/s3.log --logappend --fork
-
启动 Config Server
[root@localhost ~]# mkdir -p /mnt/data/www/mongodb/shared/config
[root@localhost ~]# /usr/local/mongodb/bin/mongod --port 27100 --dbpath=/mnt/data/www/mongodb/shared/config --logpath=/mnt/data/www/mongodb/shared/log/config.log --logappend --fork
注意: 我们可以像启动普通 mongodb 服务一样启动,不需要添加 —shardsvr 和 configsvr 参数,因为这两个参数的作用就是改变启动端口的,只要我们自行指定了端口就可以
-
启动 Query Routers Server
[root@localhost ~]# /usr/local/mongodb/bin/mongos --port 40000 --configdb localhost:27100 --fork --logpath=/mnt/data/www/mongodb/shared/log/route.log --chunkSize 500

mongos 启动参数中,chunkSize 这一项是用来指定 chunk 的大小的,单位是 MB,默认大小为 200MB
-
配置 Sharding
我们使用 MongoDB Shell 登录到 mongos ,添加 Shard 节点
[root@localhost ~]# /usr/local/mongodb/bin/mongo admin --port 40000
MongoDB shell version v3.4.9
connecting to: mongodb://127.0.0.1:40000/admin
MongoDB server version: 3.4.9
mongos> db.runCommand({ addshard:"localhost:27020" })
{ "shardAdded" : "shard0000", "ok" : 1 }
mongos> db.runCommand({ addshard:"localhost:27021" })
{ "shardAdded" : "shard0001", "ok" : 1 }
mongos> db.runCommand({ addshard:"localhost:27022" })
{ "shardAdded" : "shard0002", "ok" : 1 }
mongos> db.runCommand({ addshard:"localhost:27023" })
{ "shardAdded" : "shard0003", "ok" : 1 }
mongos> db.runCommand({ enablesharding:"test" }) #设置分片存储的数据库 { "ok" : 1 } mongos> db.runCommand({ shardcollection: "test.log", key: { id:1,time:1}}) { "collectionsharded" : "test.log", "ok" : 1 } -
程序代码内无需太大更改,直接按照连接普通的 mongo 数据库,但需要将数据库连接接入端口改为 40000