Java 多线程编程
一个多线程程序包含两个或多个能并发运行的部分
程序的每一部分都称作一个线程,并且每个线程定义了一个独立的执行路径
多线程是多任务的一种特别的形式,但多线程使用了更小的资源开销
多线程能满足程序员编写高效率的程序来达到充分利用 CPU 的目的
Java 给多线程编程提供了内置的支持
一个线程的生命周期
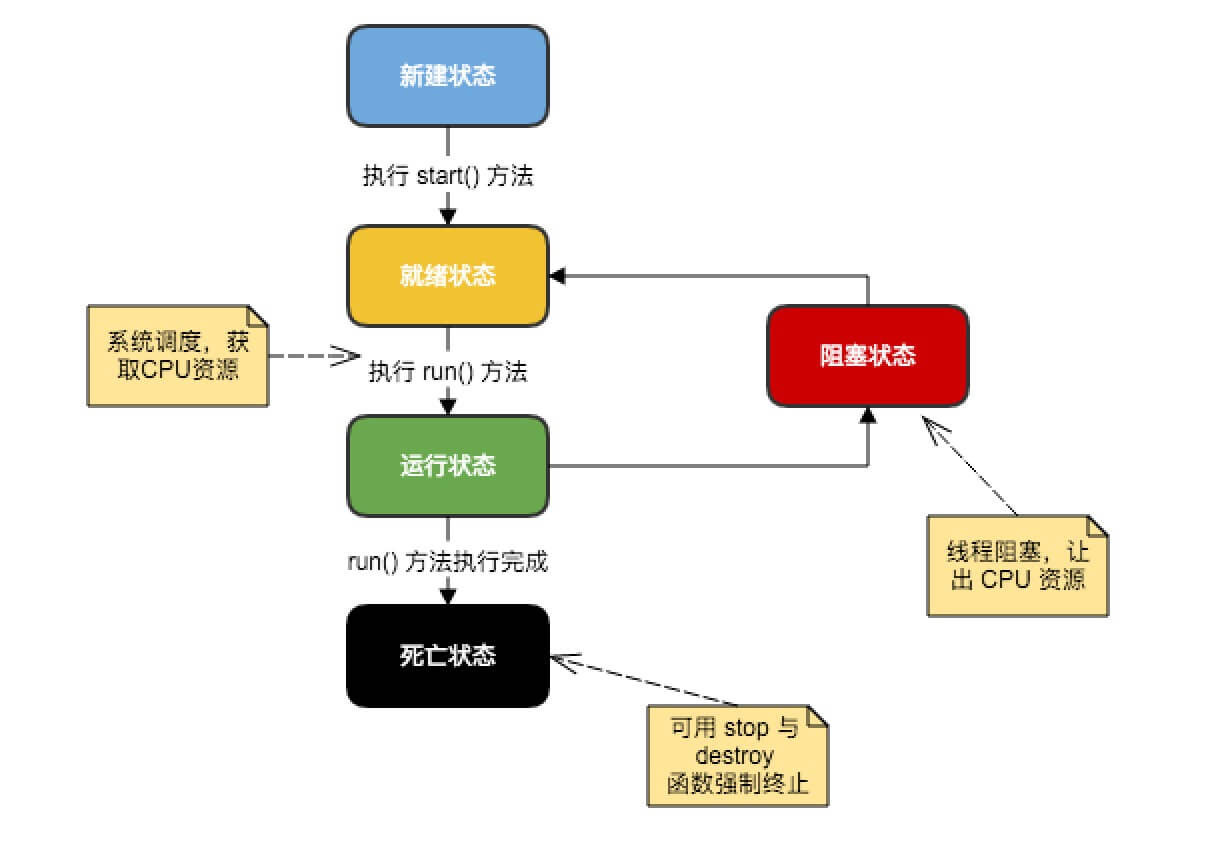
线程是一个动态执行的过程,它也有一个从产生到死亡的过程
下图显示了一个线程完整的生命周期
-
新建状态
使用 new 关键字和 Thread 类或其子类建立一个线程对象后,该线程对象就处于新建状态
它保持这个状态直到程序 start() 这个线程
-
就绪状态
当线程对象调用了start()方法之后,该线程就进入就绪状态
就绪状态的线程处于就绪队列中,要等待 JVM 里线程调度器的调度
-
运行状态
如果就绪状态的线程获取 CPU 资源,就可以执行 run() ,此时线程便处于运行状态
处于运行状态的线程最为复杂,它可以变为阻塞状态、就绪状态和死亡状态
-
阻塞状态
如果一个线程执行了 sleep ( 睡眠 ) 、suspend ( 挂起 ) 等方法,失去所占用资源之后,该线程就从运行状态进入阻塞状态
在睡眠时间已到或获得设备资源后可以重新进入就绪状态
可以分为三种
-
等待阻塞:运行状态中的线程执行 wait() 方法,使线程进入到等待阻塞状态
-
同步阻塞:线程在获取 synchronized 同步锁失败(因为同步锁被其他线程占用)
-
其他阻塞:通过调用线程的 sleep() 或 join() 发出了 I/O 请求时,线程就会进入到阻塞状态。当sleep() 状态超时,join() 等待线程终止或超时,或者 I/O 处理完毕,线程重新转入就绪状态
-
-
死亡状态
一个运行状态的线程完成任务或者其他终止条件发生时,该线程就切换到终止状态
线程的优先级
每一个 Java 线程都有一个优先级,这样有助于操作系统确定线程的调度顺序
Java 线程的优先级是一个整数,其取值范围是 1 ( Thread.MIN_PRIORITY ) - 10 ( Thread.MAX_PRIORITY )
默认情况下,每一个线程都会分配一个优先级 NORM_PRIORITY ( 5 )
具有较高优先级的线程对程序更重要,并且应该在低优先级的线程之前分配处理器资源
但是,线程优先级不能保证线程执行的顺序,而且非常依赖于平台
创建一个线程
Java 提供了三种创建线程的方法
- 通过实现 Runnable 接口
- 通过继承 Thread 类本身
- 通过 Callable 和 Future 创建线程
通过实现 Runnable 接口来创建线程
创建一个线程,最简单的方法是创建一个实现 Runnable 接口的类
为了实现 Runnable,一个类只需要执行一个方法调用 run()
public void run()
我们可以重写该方法,重要的是理解的 run() 可以调用其它方法,使用其它类,并声明变量,就像主线程一样
创建一个实现 Runnable 接口的类之后,我们就可以在类中实例化一个线程对象
Thread 定义了几个构造方法,下面这个则是经常使用的
Thread(Runnable threadOb, String threadName);
- threadOb 是一个实现 Runnable 接口的类的实例
- threadName 用于指定新线程的名字
新线程创建之后,我们可以调用它的 start() 方法它才会运行
void start();
范例
下面的范例用于创建线程并开始让它执行的实例
class RunnableDemo implements Runnable {
   private Thread t;
   private String threadName;

   RunnableDemo( String name) {
      threadName = name;
      System.out.println("Creating " +  threadName );
   }

   public void run() {
      System.out.println("Running " +  threadName );
      try {
         for(int i = 4; i > 0; i--) {
            System.out.println("Thread: " + threadName + ", " + i);
            // 让线程睡眠一会
            Thread.sleep(50);
         }
      }catch (InterruptedException e) {
         System.out.println("Thread " +  threadName + " interrupted.");
      }
      System.out.println("Thread " +  threadName + " exiting.");
   }

   public void start () {
      System.out.println("Starting " +  threadName );
      if (t == null) {
         t = new Thread (this, threadName);
         t.start ();
      }
   }
}

public class TestThread {

   public static void main(String args[]) {
      RunnableDemo R1 = new RunnableDemo( "Thread-1");
      R1.start();

      RunnableDemo R2 = new RunnableDemo( "Thread-2");
      R2.start();
   }
}
编译运行以上 Java 代码,输出结果如下
Creating Thread-1
Starting Thread-1
Creating Thread-2
Starting Thread-2
Running Thread-1
Thread: Thread-1, 4
Running Thread-2
Thread: Thread-2, 4
Thread: Thread-1, 3
Thread: Thread-2, 3
Thread: Thread-1, 2
Thread: Thread-2, 2
Thread: Thread-1, 1
Thread: Thread-2, 1
Thread Thread-1 exiting.
Thread Thread-2 exiting.
通过继承 Thread 来创建线程
创建一个线程的第二种方法是创建一个新的类,该类继承 Thread 类,然后创建一个该类的实例
继承类必须重写 run() 方法,该方法是新线程的入口点,同时也必须调用 start() 方法才能执行
class ThreadDemo extends Thread {
   private Thread t;
   private String threadName;

   ThreadDemo( String name) {
      threadName = name;
      System.out.println("Creating " +  threadName );
   }

   public void run() {
      System.out.println("Running " +  threadName );
      try {
         for(int i = 4; i > 0; i--) {
            System.out.println("Thread: " + threadName + ", " + i);
            // 让线程睡醒一会
            Thread.sleep(50);
         }
      }catch (InterruptedException e) {
         System.out.println("Thread " +  threadName + " interrupted.");
      }
      System.out.println("Thread " +  threadName + " exiting.");
   }

   public void start () {
      System.out.println("Starting " +  threadName );
      if (t == null) {
         t = new Thread (this, threadName);
         t.start ();
      }
   }
}

public class TestThread {

   public static void main(String args[]) {
      ThreadDemo T1 = new ThreadDemo( "Thread-1");
      T1.start();

      ThreadDemo T2 = new ThreadDemo( "Thread-2");
      T2.start();
   }
}
编译运行以上 Java 代码,输出结果如下
Creating Thread-1
Starting Thread-1
Creating Thread-2
Starting Thread-2
Running Thread-1
Thread: Thread-1, 4
Running Thread-2
Thread: Thread-2, 4
Thread: Thread-1, 3
Thread: Thread-2, 3
Thread: Thread-1, 2
Thread: Thread-2, 2
Thread: Thread-1, 1
Thread: Thread-2, 1
Thread Thread-1 exiting.
Thread Thread-2 exiting.
Thread 类的方法
下表列出了 Thread 类的一些重要方法
| 方法 | 描述 |
|---|---|
| public void start() | 使该线程开始执行;Java虚拟机调用该线程的 run 方法 |
| public void run() | 如果该线程是使用独立的 Runnable 运行对象构造的,则调用该 Runnable 对象的 run 方法;否则,该方法不执行任何操作并返回 |
| public final void setName(String name) | 改变线程名称,使之与参数 name 相同 |
| public final void setPriority(int priority) | 更改线程的优先级 |
| public final void setDaemon(boolean on) | 将该线程标记为守护线程或用户线程 |
| public final void join(long millisec) | 等待该线程终止的时间最长为 millis 毫秒 |
| public void interrupt() | 中断线程 |
| public final boolean isAlive() | 测试线程是否处于活动状态 |
下表列出了 Thread 类的静态方法
| 方法描述 |
|---|
| public static void yield() 暂停当前正在执行的线程对象,并执行其他线程 |
| public static void sleep(long millisec) 在指定的毫秒数内让当前正在执行的线程休眠(暂停执行),此操作受到系统计时器和调度程序精度和准确性的影响 |
| public static boolean holdsLock(Object x) 当且仅当当前线程在指定的对象上保持监视器锁时,才返回 true |
| public static Thread currentThread() 返回对当前正在执行的线程对象的引用 |
| public static void dumpStack() 将当前线程的堆栈跟踪打印至标准错误流 |
下面的范例演示了 Thread 类的一些方法的使用
public class DisplayMessage implements Runnable {
   private String message;

   public DisplayMessage(String message) {
      this.message = message;
   }

   public void run() {
      while(true) {
         System.out.println(message);
      }
   }
}
GuessANumber.java
public class GuessANumber extends Thread {
   private int number;
   public GuessANumber(int number) {
      this.number = number;
   }

   public void run() {
      int counter = 0;
      int guess = 0;
      do {
         guess = (int) (Math.random() * 100 + 1);
         System.out.println(this.getName() + " guesses " + guess);
         counter++;
      } while(guess != number);
      System.out.println("** Correct!" + this.getName() + "in" + counter + "guesses.**");
   }
}
ThreadClassDemo.java
public class ThreadClassDemo {

   public static void main(String [] args) {
      Runnable hello = new DisplayMessage("Hello");
      Thread thread1 = new Thread(hello);
      thread1.setDaemon(true);
      thread1.setName("hello");
      System.out.println("Starting hello thread...");
      thread1.start();

      Runnable bye = new DisplayMessage("Goodbye");
      Thread thread2 = new Thread(bye);
      thread2.setPriority(Thread.MIN_PRIORITY);
      thread2.setDaemon(true);
      System.out.println("Starting goodbye thread...");
      thread2.start();

      System.out.println("Starting thread3...");
      Thread thread3 = new GuessANumber(27);
      thread3.start();
      try {
         thread3.join();
      }catch(InterruptedException e) {
         System.out.println("Thread interrupted.");
      }
      System.out.println("Starting thread4...");
      Thread thread4 = new GuessANumber(75);

      thread4.start();
      System.out.println("main() is ending...");
   }
}
编译运行以上 Java 代码,输出结果如下
Starting hello thread...
Starting goodbye thread...
Hello
Hello
Hello
Hello
Hello
Hello
Goodbye
Goodbye
Goodbye
Goodbye
Goodbye
.......
通过 Callable 和 Future 创建线程
-
创建 Callable 接口的实现类,并实现 call() 方法,该 call() 方法将作为线程执行体,并且有返回值
-
创建 Callable 实现类的实例,使用 FutureTask 类来包装 Callable 对象,该 FutureTask 对象封装了该 Callable 对象的 call() 方法的返回值
-
使用 FutureTask 对象作为 Thread 对象的 target 创建并启动新线程
-
调用 FutureTask 对象的 get() 方法来获得子线程执行结束后的返回值
范例
下面的范例使用 Callable 和 Future 创建线程
public class CallableThreadTest implements Callable<Integer> {
    public static void main(String[] args)
    {
        CallableThreadTest ctt = new CallableThreadTest();
        FutureTask<Integer> ft = new FutureTask<>(ctt);
        for(int i = 0;i < 100;i++)
        {
            System.out.println(Thread.currentThread().getName()+" 的循环变量i的值"+i);
            if(i==20)
            {
                new Thread(ft,"有返回值的线程").start();
            }
        }
        try
        {
            System.out.println("子线程的返回值:"+ft.get());
        } catch (InterruptedException e)
        {
            e.printStackTrace();
        } catch (ExecutionException e)
        {
            e.printStackTrace();
        }

    }
    @Override
    public Integer call() throws Exception
    {
        int i = 0;
        for(;i<100;i++)
        {
            System.out.println(Thread.currentThread().getName()+" "+i);
        }
        return i;
    }
}
创建线程的三种方式的对比
-
采用实现 Runnable、Callable 接口的方式创见多线程时,线程类只是实现了 Runnable 接口或 Callable 接口,还可以继承其他类
-
使用继承 Thread 类的方式创建多线程时,编写简单,如果需要访问当前线程,则无需使用 Thread.currentThread() 方法,直接使用 this 即可获得当前线程
多线程的使用
有效利用多线程的关键是理解程序是并发执行而不是串行执行的
例如:程序中有两个子系统需要并发执行,这时候就需要利用多线程编程
通过对多线程的使用,可以编写出非常高效的程序
不过请注意,如果创建太多的线程,程序执行的效率实际上是降低了,而不是提升了
请记住,上下文的切换开销也很重要,如果你创建了太多的线程,CPU 花费在上下文的切换的时间将多于执行程序的时间