Android ConstraintLayout 约束布局
Android ConstraintLayout (约束布局) 是 Android Studio 2.3+ 创建 activity_main.xml 的默认布局方式,本来这个布局我们一开始就要学习的,放到最后是因为,她是最近发布的
前面几个布局都有自己的缺点
- AbsoluteLayout 灵活,但是设计 UI 太难,尤其是需要自己去对齐像素,而且,适配机子太复杂。所以被抛弃了
- LinearLayout 简单的堆砌方式,复杂度随着 UI 复杂度指数级上升
- GridLayout 和 TableLayout 两个布局使用场景相对单一
- RelativeLayout 灵活,但就是太灵活了,而且只限于父子和兄弟之间布局
所以我们一般推荐使用 LinearLayout + RelativeLayout 组合布局,LinearLayout 复杂大的布局,RelativeLayout 负责细节布局
是的,这在 ConstraintLayout 出来之前的 黄金搭档,而 ConstraintLayout 则兼顾了它们的优点,当然缺点也是有的,就是学习起来太复杂,属性太多....不过学会了就事半功倍了
ConstraintLayout 约束布局
ConstraintLayout ,字面翻译就是 约束布局 ,我本来想改成适配布局的...因为约束的目的就是适配
ConstraintLayout,我们可以理解为 RelativeLayout 的升级版,目的在于尽可能的使布局宽而短,而不是 窄而长
就是减少嵌套的复杂度
ConstraintLayout 布局中最重要的参数是 ID ( @id/button1 ) 和 parent
ConstraintLayout 约束布局分类
我们知道 ConstraintLayout 也是一种约束布局,而约束的方式则有以下几种
- 相对定位 (Relative positioning)
- 边距 ( Margins )
- 居中定位和偏向 ( Centering positioning and bias )
- 环形定位 ( Circular positioning )
- 对可见性的处理 ( Visibility behavior )
- 尺寸约束 ( Dimension constraints )
- 链 ( Chains )
- 辅助布局 ( Virtual Helpers objects )
相对定位 (Relative positioning)
相对定位 (Relative positioning) 约束允许我们将给定的小部件相对于另一个小部件进行定位
简单的理解就是将小部件的给定侧约束到任何其它小部件的另一侧
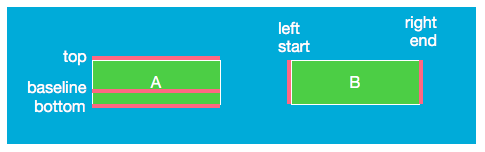
相对定位允许在水平方向或垂直方向约束一个小部件
- 水平方向:左侧(left),右侧(right),起始(start) 和 结束 (end)
- 垂直方向:顶部(top),底部(bottom) 和 文本基线 (text baseline)
例如,有两个按钮 A 和 B ,我们可以将 B 定位在 A 的右侧
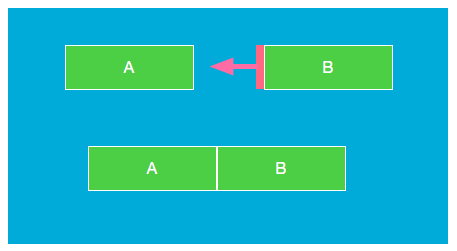
XML 代码是这样的
<Button android:id="@+id/A" />
    <Button android:id="@+id/B"
        app:layout_constraintLeft_toRightOf="@+id/A" />
这告诉系统我们希望按钮B的左侧被限制在按钮 A 的右侧
这样的位置约束意味着系统将尝试让双方共享相同的位置
下表列出了可用约束的属性列表
| 属性 |
|---|
| layout_constraintLeft_toLeftOf |
| layout_constraintLeft_toRightOf |
| layout_constraintRight_toLeftOf |
| layout_constraintRight_toRightOf |
| layout_constraintTop_toTopOf |
| layout_constraintTop_toBottomOf |
| layout_constraintBottom_toTopOf |
| layout_constraintBottom_toBottomOf |
| layout_constraintBaseline_toBaselineOf |
| layout_constraintStart_toEndOf |
| layout_constraintStart_toStartOf |
| layout_constraintEnd_toStartOf |
| layout_constraintEnd_toEndOf |
属性都形如 layout_constraintXXX_toYYYOf
-
constraintXXX里的XXX代表是这个子控件自身的哪条边( Left、Right、Top、Bottom、Baseline), 而toYYYOf里的YYY代表的是和约束控件的哪条边 发生约束(取值同样是 Left、Right、Top、Bottom、Baseline) -
当
XXX和YYY相反时,表示控件自身的XXX在约束控件的YYY的一侧, 如app:layout_constraintLeft_toRightOf="@id/button1",表示的是控件自身的左侧在button1的右侧 -
当
XXX和YYY相同时,表示控件自身的XXX和约束控件的YYY的一侧对齐, 如app:layout_constraintBottom_toBottomOf="parent",表示控件自身底端和父控件底端对齐<?xml version="1.0" encoding="utf-8"?> <Button android:id="@+id/B" app:layout_constraintBottom_toBottomOf="parent" />
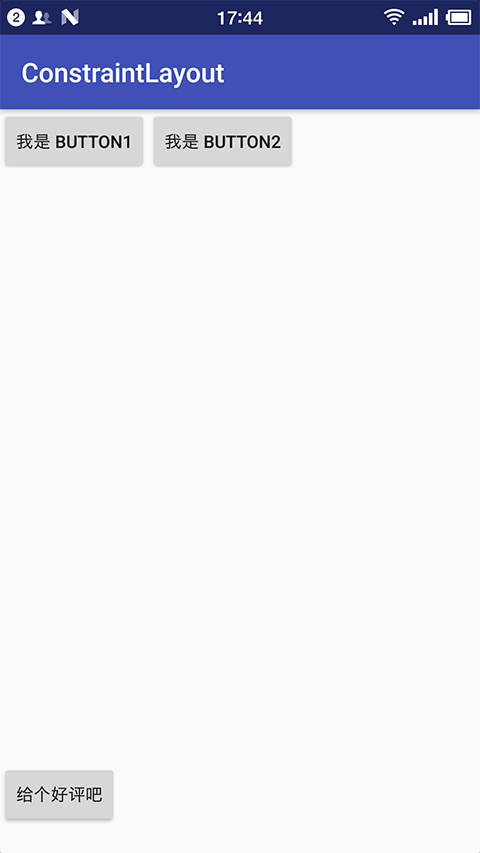
范例
-
创建一个 空的 Android 项目
cn.twle.android.ConstraintLayout -
修改
activity_main.xml为以下内容<?xml version="1.0" encoding="utf-8"?> <android.support.constraint.ConstraintLayout xmlns:android="http://schemas.android.com/apk/res/android" xmlns:app="http://schemas.android.com/apk/res-auto" android:layout_width="match_parent" android:layout_height="match_parent"> <Button android:id="@+id/button1" android:layout_width="wrap_content" android:layout_height="wrap_content" android:text="我是 Button1"/> <Button android:id="@+id/button2" android:layout_width="wrap_content" android:layout_height="wrap_content" android:text="我是 button2" app:layout_constraintLeft_toRightOf="@id/button1"/> <Button android:id="@+id/button3" android:layout_width="wrap_content" android:layout_height="wrap_content" android:layout_marginBottom="20dp" android:text="给个好评吧" app:layout_constraintBottom_toBottomOf="parent"/> </android.support.constraint.ConstraintLayout>
运行范例,显示结果如下