Android 动画补间器 Interpolator
Interpolator 用来控制动画的变化速度,可以理解成动画渲染器
其实在讲补间动画的时候我们就提到过补间器 (Interpolator),所有的补间器 (Interpolator) 都继承自 TimeInterpolator
Android 已经为我们提供了好多个动画补间器实现类
| 类 | 说明 |
|---|---|
| LinearInterpolator | 动画以均匀的速度改变 |
| AccelerateInterpolator | 在动画开始的地方改变速度较慢,然后开始加速 |
| AccelerateDecelerateInterpolator | 在动画开始、结束的地方改变速度较慢,中间时加速 |
| AnticipateInterpolator | 反向,先按反方向改变一段距离然后加速 |
| AnticipateOvershootInterpolator | 开始的时候反向,然后快速向前甩出一段距离然后缓缓回到目的地 |
| BaseInterpolator | Interpolator 的基本实现类 |
| BounceInterpolator | 跳跃,快结束时值会跳跃,如果目的值是 100,后面的可能值会 88 77 70 95 100 |
| CycleInterpolator | 动画循环播放特定次数,变化速度按正弦曲线改变 |
| DecelerateInterpolator | 在动画开始的地方变化较快,后面逐渐减低速度 |
| OvershootInterpolator | 回弹,在超出目标值会回弹,然后会缓缓回到目标值 |
| PathInterpolator | 贝赛尔曲线速度 |
Interpolator 在 XML 中的使用
上面这些补间器,我们都可以在 XML 中使用,属性是 android:interpolator 而上面的对应值是 @android:anim/linear_interpolator,其实就是驼峰命名法变成下划线,所以 AccelerateInterpolator 对应的就是 @android:anim/accelerate_interpolator
范例
我们先来看看几个补间器的效果
AccelerateInterpolator
使用方式 setInterpolator(new AccelerateInterpolator(2f)) 括号里的值用于控制加速度
-
创建一个 空的 Android 项目
cn.twle.android.InterpolatorDemo -
修改
activity_main.xml添加一个<Button><?xml version="1.0" encoding="utf-8" ?> <LinearLayout xmlns:android="http://schemas.android.com/apk/res/android" android:layout_width="match_parent" android:layout_height="match_parent" android:id="@+id/ms_layout" android:orientation="vertical" > <TextView android:id="@+id/ms_textview" android:background="#ff0000" android:layout_width="64dp" android:layout_height="64dp"/> </LinearLayout>
-
修改
MainActivity.javapackage cn.twle.android.interpolatordemo; import android.animation.ValueAnimator; import android.support.v7.app.AppCompatActivity; import android.view.animation.AccelerateInterpolator; import android.view.animation.BounceInterpolator; import android.os.Bundle; import android.widget.TextView; public class MainActivity extends AppCompatActivity { TextView ms_textview; float scale; @Override protected void onCreate(Bundle savedInstanceState) { super.onCreate(savedInstanceState); setContentView(R.layout.activity_main); scale = MainActivity.this.getResources().getDisplayMetrics().density; ms_textview = findViewById(R.id.ms_textview); final int y = ms_textview.getTop(); ValueAnimator xValue = ValueAnimator.ofInt(0,1000); xValue.addUpdateListener(new ValueAnimator.AnimatorUpdateListener() { @Override public void onAnimationUpdate(ValueAnimator animation) { int cur = (int) animation.getAnimatedValue(); ms_textview.layout( 0, y+ cur, dp2px(64), y+cur+dp2px(64) ); } }); xValue.setDuration(3000L); xValue.setInterpolator(new AccelerateInterpolator(2f)); xValue.start(); } public int dp2px(float dpValue){ return (int)(dpValue* scale+0.5f); } }
如果需要有回弹效果,可以把
xValue.setInterpolator(new AccelerateInterpolator(2f));
改成
xValue.setInterpolator(new BounceInterpolator());
Interpolator 内部实现机制
我们先看看 TimeInterpolator 接口的源码,它只定义了 getInterpolation() 方法
/**
 * A time interpolator defines the rate of change of an animation. This allows animations
 * to have non-linear motion, such as acceleration and deceleration.
 */
public interface TimeInterpolator {

    /**
     * Maps a value representing the elapsed fraction of an animation to a value that represents
     * the interpolated fraction. This interpolated value is then multiplied by the change in
     * value of an animation to derive the animated value at the current elapsed animation time.
     *
     * @param input A value between 0 and 1.0 indicating our current point
     *        in the animation where 0 represents the start and 1.0 represents
     *        the end
     * @return The interpolation value. This value can be more than 1.0 for
     *         interpolators which overshoot their targets, or less than 0 for
     *         interpolators that undershoot their targets.
     */
    float getInterpolation(float input);
}
getInterpolation() 方法中接收一个 input 参数,这个参数的值会随着动画的运行而不断变化
input 的变化是非常有规律的,就是根据设定的动画时长匀速增加,变化范围是 0 到 1
也就是说当动画一开始的时候 input 的值是 0,到动画结束的时候 input 的值是 1,而中间的值则 是随着动画运行的时长在 0 到 1 之间变化的
input 值决定了我们 TypeEvaluator 接口里的 fraction 的值
input 的值是由系统经过计算后传入到 getInterpolation() 方法中的,如果可以自己实现 getInterpolation() 方法中的算法,根据 input 的值来计算出一个返回值,而这个返回值就是 fraction 了
LinearInterpolator
我们可以看看 LinearInterpolator 里的代码
public float getInterpolation(float input) {
    return input;
}
这里没有处理过直接返回 input 值,即 fraction 的值就是等于 input 的值,这就是匀速运动的
Interpolator的实现方式
BounceInterpolator
private static float bounce(float t) {
    return t * t * 8.0f;
}

public float getInterpolation(float t) {

    t *= 1.1226f;
    if (t < 0.3535f) return bounce(t);
    else if (t < 0.7408f) return bounce(t - 0.54719f) + 0.7f;
    else if (t < 0.9644f) return bounce(t - 0.8526f) + 0.9f;
    else return bounce(t - 1.0435f) + 0.95f;
}
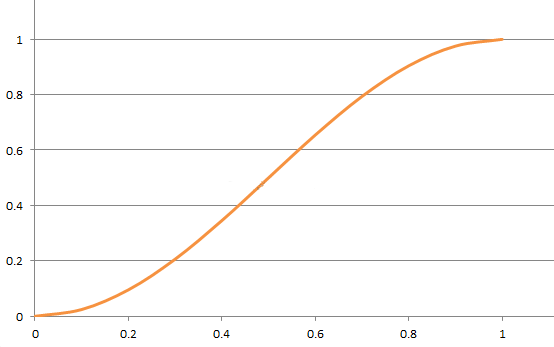
AccelerateDecelerateInterpolator
public float getInterpolation(float input) {
    return (float)(Math.cos((input + 1) * Math.PI) / 2.0f) + 0.5f;
}
这个Interpolator 是先加速后减速效果的 (float)(Math.cos((input + 1) * Math.PI) / 2.0f) + 0.5f
由 input 的取值范围为 [0,1] ,可以得出 cos 中的值的取值范围为 [π,2π],对应的值为 -1和 1
再用这个值来除以 2 加上 0.5 之后,getInterpolation() 方法最终返回的结果值范围还是[0,1],
对应的曲线图如下