Android RelativeLayout 相对布局
前面几章节中我们学习了 LinearLayout 线性布局,线性布局最主要的是 layout_weight 权重属性,在一些简单的布局中,线性布局是非常不错的,但是复杂一点的布局中,线性布局就显得臃肿了,会让界面非常复杂
多层嵌套的线性布局会降低 UI Render 的效率(渲染速度),这时候就需要 RelativeLayout 相对布局来解救了
RelativeLayout 相对布局
相对布局 (RelativeLayout) 以父容器或者兄弟组件参考+margin +padding 来设置组件的显示位置
RelativeLayout 布局属性
相对布局 (RelativeLayout) 有很多属性,我们把它们归于以下几类
-
基本属性
XML 属性 说明 android:gravity 设置容器内组件的排序方式 android:ignoreGravity 如果设置改属性为 true,将忽略 android:gravity -
根据父容器定位属性
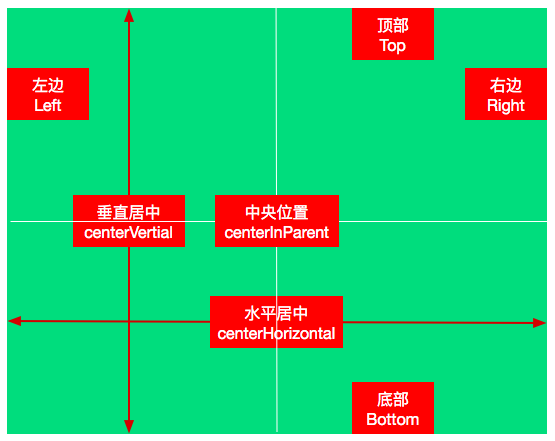
XML 属性 说明 android:layout_alignParentLeft 左对齐父容器 android:layout_alignParentRight 右对齐父容器 android:layout_alignParentTop 顶部对齐父容器 android:layout_alignParentBottom 底部对齐父容器 android:layout_centerHorizontal 在父容器中水平居中 android:layout_centerVertical 在父容器中垂直居中 android:layout_centerInParent 在父容器的居中位置 各个属性示意图如下
-
根据兄弟组件定位属性
XML 属性 说明 android:layout_toLeftOf 紧贴参考组件的左边 android:layout_toRightOf 紧贴参考组件的右边 android:layout_above 紧贴参考组件的上方 android:layout_below 紧贴参考组件的下方 android:layout_alignTop 对齐参考组件的上边界 android:layout_alignBottom 对齐参考组件的下边界 android:layout_alignLeft 对齐参考组件的左边界 android:layout_alignRight 对齐参考组件的右边界 兄弟组件定位就是处于同一层次容器的组件
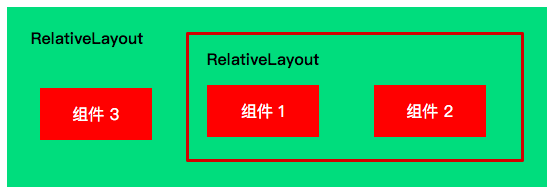
图中的组件1,2就是兄弟组件了,而组件3与组件1或组件2并不是兄弟组件,所以组件3 不能通过 组件1或 2来进行定位
比如
layout_toleftof = "组件1"这样是会报错的 -
设置外边距(偏移)属性
XML 属性 说明 android:layout_maring 设置组件上下左右的偏移量 android:layout_marginLeft 设置组件左边的偏移量 android:layout_marginRight 设置组件右边的偏移量 android:layout_marginTop 设置组件上边的偏移量 android:layout_marginBottom 设置组件下边的偏移量 上面这些属性用于设置组件对本来位置的偏移量
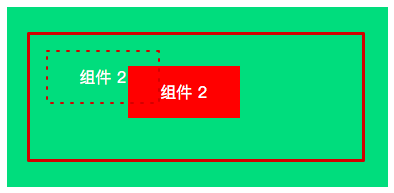
虚线框是组件2 本来的位置,如果设置了组件上边和左边的边距,则位置会发生一定的偏移,向右下偏移
-
设置内边距(填充)属性
XML 属性 说明 android:padding 设置组件上下左右的填充 android:paddingLeft 设置组件左边的填充 android:paddingRight 设置组件右边的填充 android:paddingTop 设置组件上边的填充 android:paddingBottom 设置组件下边的填充 上面这些属性用于设置组件的内边距,内边距主要用于设置组件边框和子组件之间的间隙
几大属性的关系
其实几大属性之间没什么大的关系,但是有几个点值得注意
- 设置父组件的内边距和设置子组件的外边距几乎可以达到同样的效果
- 设置一个组件相对于另一个组件的位置,其实也可以用设置一个组件的外边距达到同样的效果
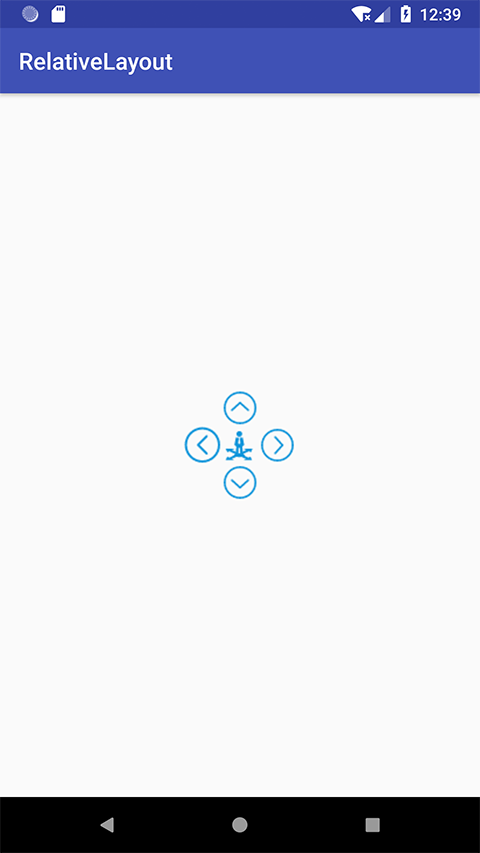
梅花布局
兄弟组件定位最经典的例子就是 "梅花布局"
-
首先创建一个 空的 Android 项目
cn.twle.android.relativelayout -
然后将 arrow.zip 里的图片拖到
res/drawable目录下 -
修改
activity_main.xml创建梅花布局
<RelativeLayout xmlns:android="http://schemas.android.com/apk/res/android"
    xmlns:tools="http://schemas.android.com/tools"
    android:id="@+id/RelativeLayout1"
    android:layout_width="match_parent"
    android:layout_height="match_parent" >

    <!-- 这个是在容器中央的 -->

    <ImageView
        android:id="@+id/center"
        android:layout_width="32dp"
        android:layout_height="32dp"
        android:layout_centerInParent="true"
        android:src="@drawable/center"/>

    <!-- 在中间图片的左边 -->
    <ImageView
        android:id="@+id/left"
        android:layout_width="32dp"
        android:layout_height="32dp"
        android:layout_toLeftOf="@id/center"
        android:layout_centerVertical="true"
        android:src="@drawable/left"/>

    <!-- 在中间图片的右边 -->
    <ImageView
        android:id="@+id/right"
        android:layout_width="32dp"
        android:layout_height="32dp"
        android:layout_toRightOf="@id/center"
        android:layout_centerVertical="true"
        android:src="@drawable/right"/>

    <!-- 在中间图片的上面-->
    <ImageView
        android:id="@+id/top"
        android:layout_width="32dp"
        android:layout_height="32dp"
        android:layout_above="@id/center"
        android:layout_centerHorizontal="true"
        android:src="@drawable/top"/>

    <!-- 在中间图片的下面 -->
    <ImageView
        android:id="@+id/bottom"
        android:layout_width="32dp"
        android:layout_height="32dp"
        android:layout_below="@id/center"
        android:layout_centerHorizontal="true"
        android:src="@drawable/bottom"/>

</RelativeLayout>
margin 与 padding 的区别
我们前面有提到过,其实,某些方面说, margin 与 padding 都能实现同样的效果
但是它们之间是有差别的
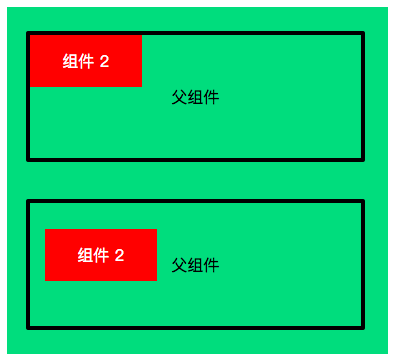
- margin 代表的是偏移,比如 marginleft = "5dp" 表示组件离容器左边缘偏移 5dp
- padding 代表的则是填充,而填充的对象针对的是组件中的元素,比如 TextView 中的文字 比如为 TextView 设置 paddingleft = "5dp",则是在组件里的元素的左边填充 5dp 的空间
- margin 针对的是容器中的组件,而 padding 针对的是组件中的元素
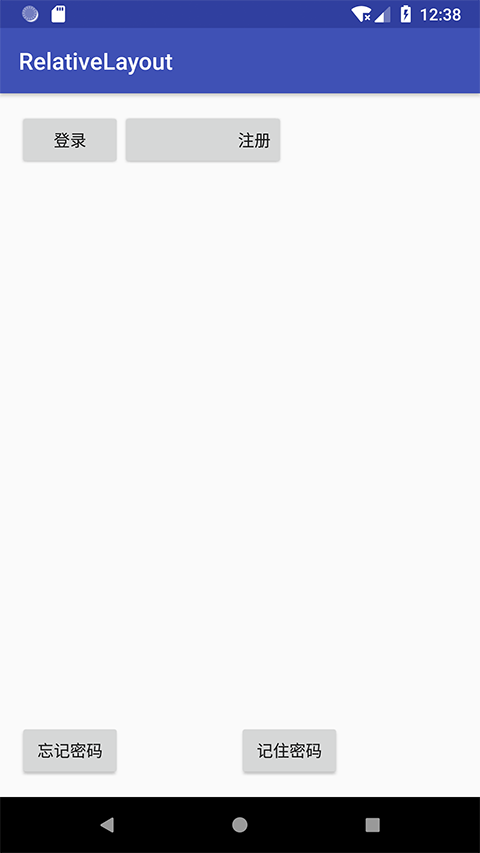
我们用一个范例来演示下这种区别
-
首先创建一个 空的 Android 项目
cn.twle.android.relativelayout -
在
res/values下创建一个文件dimens.xml,输入以下内容<resources> <dimen name="activity_horizontal_margin">16dp</dimen> <dimen name="activity_vertical_margin">16dp</dimen> </resources>
设置水平和垂直的外边距为
16dp -
修改
activity_main.xml
<RelativeLayout xmlns:android="http://schemas.android.com/apk/res/android"
    xmlns:tools="http://schemas.android.com/tools"
    android:layout_width="match_parent"
    android:layout_height="match_parent"
    android:paddingBottom="@dimen/activity_vertical_margin"
    android:paddingLeft="@dimen/activity_horizontal_margin"
    android:paddingRight="@dimen/activity_horizontal_margin"
    android:paddingTop="@dimen/activity_vertical_margin"
    tools:context=".MainActivity" >

    <Button
        android:id="@+id/btn1"
        android:layout_height="wrap_content"
        android:layout_width="wrap_content"
        android:text="登录"/>
    <Button
        android:paddingLeft="100dp"
        android:layout_height="wrap_content"
        android:layout_width="wrap_content"
        android:text="注册"
        android:layout_toRightOf="@id/btn1"/>

    <Button
        android:id="@+id/btn2"
        android:layout_height="wrap_content"
        android:layout_width="wrap_content"
        android:text="忘记密码"
        android:layout_alignParentBottom="true"/>
    <Button
        android:layout_marginLeft="100dp"
        android:layout_height="wrap_content"
        android:layout_width="wrap_content"
        android:text="记住密码"
        android:layout_toRightOf="@id/btn2"
        android:layout_alignParentBottom="true"/>

</RelativeLayout>
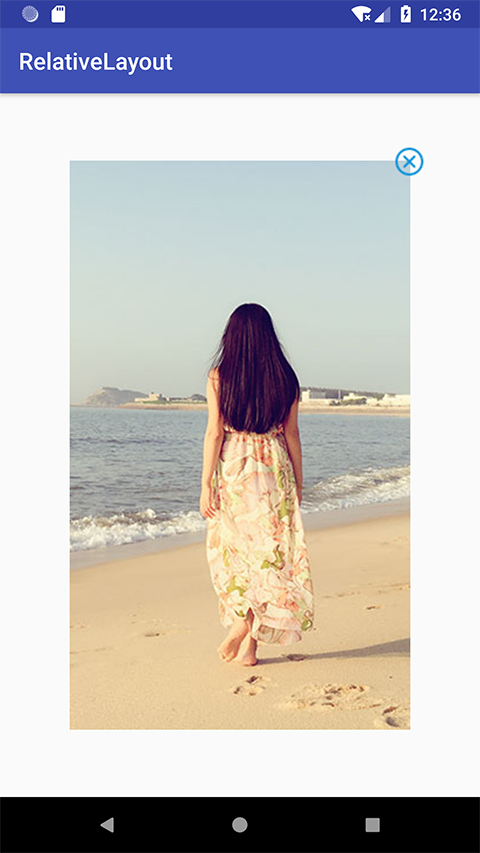
layout:margin 序列属性值可以为负数
layout:margin 序列属性值为负数的情况一般用在弹出框的关闭按钮
弹出框右上角的 × 按钮的 margin 使用的就是负数
- 首先创建一个 空的 Android 项目
cn.twle.android.relativelayout - 下载图片 /static/i/android/close.png ,并保存到
res/drawable目录下 - 下载图片 /static/i/meimei.jpg,并保存到
res/drawable目录下 - 修改
activity_main.xml
<RelativeLayout xmlns:android="http://schemas.android.com/apk/res/android"
    android:layout_width="match_parent"
    android:layout_height="match_parent"
    android:background="#00CCCCFF">

    <ImageView
        android:id="@+id/imgBack"
        android:layout_width="292dp"
        android:layout_height="488dp"
        android:layout_centerInParent="true"
        android:background="@drawable/meimei" />

    <ImageView
        android:id="@+id/imgCancle"
        android:layout_width="32dp"
        android:layout_height="32dp"
        android:layout_alignRight="@id/imgBack"
        android:layout_alignTop="@id/imgBack"
        android:background="@drawable/close"
        android:layout_marginTop="-15dp"
        android:layout_marginRight="-15dp" />

</RelativeLayout>