Android ListView 列表控件
关于 ListView ,其实 Android Adapter 适配器 和 Android 自定义 Adapter 都有已经使用过好几次了,我们这里就不再讲解基本的使用了
ListView 的属性和方法
ListView 有以下属性,可以对其外观进行某些程度上的定制
| 属性 | 说明 |
|---|---|
| android:footerDividersEnabled | 是否在 footerView(表尾) 前绘制一个分隔条,默认为 true |
| android:headerDividersEnabled | 是否在 headerView(表头) 前绘制一个分隔条,默认为 true |
| android:divider | 设置分隔条,可以用颜色分割,也可以用 drawable 资源分割 |
| android:dividerHeight | 设置分隔条的高度 |
| android:entries | ListView 要显示的数据资源,在 Android Adapter 适配器 我们有用到过 |
有没有发现,有属性设置 ListView 的头部和底部 view 的分隔线,却没有属性来设置这些 view
ListView 的方法也很多,几乎都是和表头表尾分隔线相关的,我们这里不对方法进行说明,只挑日常用到的几个
表头表尾分割线的设置
listview作为一个列表控件,他和普通的列表一样,可以自己设置表头与表尾以及分割线
但是翻遍了了 API 发现并没有可以直接设置 ListView 表头或者表尾的属性
所以只能在 Java 中写代码进行设置了,可供我们调用的方法如下
| 方法 | 说明 |
|---|---|
| addHeaderView(View v) | 添加headView(表头),括号中的参数是一个View对象 |
| addFooterView(View v) | 添加footerView(表尾),括号中的参数是一个View对象 |
| addHeaderView(headView, null, false) | 和前面的区别:设置Header是否可以被选中 |
| addFooterView(View,view,false) | 和前面的区别:设置 Footer 是否可以被选中 |
对了,使用这个 addHeaderView() 方法必须放在 listview.setAdapter 前面,否则会报错
下面我们就来演示下这些方法如何使用
-
复用 Android 自定义 Adapter 中的 demo
-
在
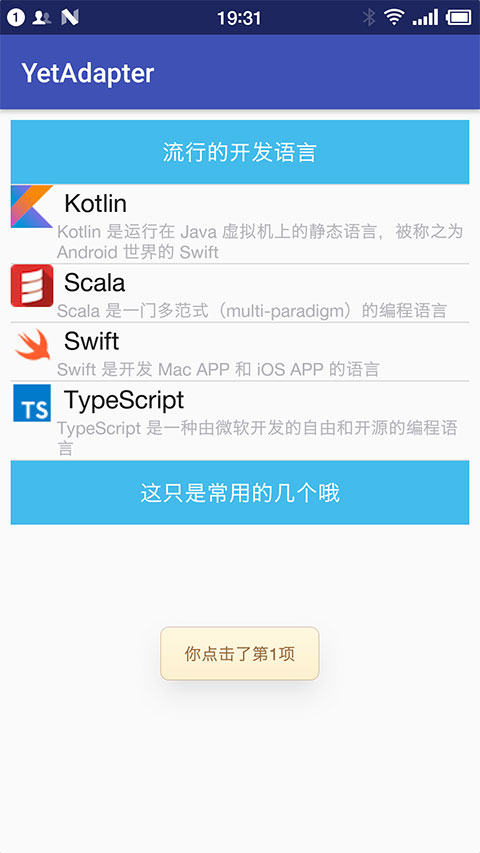
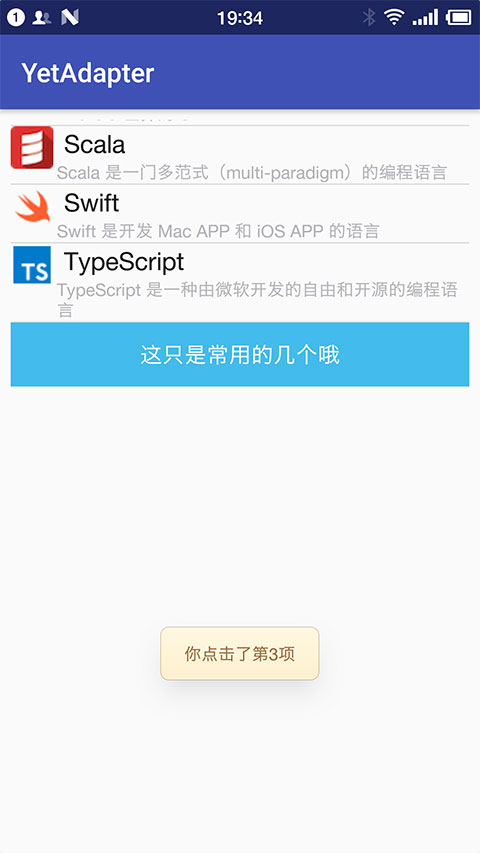
res/layout目录下新建文件listview_header.xml作为表头 view<?xml version="1.0" encoding="utf-8"?> <LinearLayout xmlns:android="http://schemas.android.com/apk/res/android" android:layout_width="match_parent" android:layout_height="match_parent" android:orientation="vertical" android:gravity="center"> <TextView android:layout_width="match_parent" android:layout_height="48dp" android:textSize="18sp" android:text="流行的开发语言" android:gravity="center" android:background="#43BBEB" android:textColor="#FFFFFF"/> </LinearLayout>
-
在
res/layout目录下新建文件listview_footer.xml作为表尾 view<?xml version="1.0" encoding="utf-8"?> <LinearLayout xmlns:android="http://schemas.android.com/apk/res/android" android:layout_width="match_parent" android:layout_height="match_parent" android:orientation="vertical" android:gravity="center"> <TextView android:layout_width="match_parent" android:layout_height="48dp" android:textSize="18sp" android:text="这只是常用的几个哦" android:gravity="center" android:background="#43BBEB" android:textColor="#FFFFFF"/> </LinearLayout>
-
修改
MainActivity.javapackage cn.twle.android.yetadapter; import android.support.v7.app.AppCompatActivity; import android.os.Bundle; import android.view.LayoutInflater; import android.view.View; import android.widget.Toast; import android.widget.AdapterView; import android.widget.ListView; import java.util.LinkedList; import java.util.List; public class MainActivity extends AppCompatActivity implements AdapterView.OnItemClickListener { @Override protected void onCreate(Bundle savedInstanceState) { super.onCreate(savedInstanceState); setContentView(R.layout.activity_main); ListView listView = (ListView) findViewById(R.id.listview); //动态加载顶部View 和底部 View final LayoutInflater inflater = LayoutInflater.from(this); View headView = inflater.inflate(R.layout.listview_header, null, false); View footView = inflater.inflate(R.layout.listview_footer, null, false); //添加表头和表尾需要写在 setAdapter() 方法调用之前 listView.addHeaderView(headView); listView.addFooterView(footView); List<YetLanguage> mData = new LinkedList<YetLanguage>(); mData.add(new YetLanguage("Kotlin", "Kotlin 是运行在 Java 虚拟机上的静态语言,被称之为 Android 世界的 Swift", R.drawable.kotlin)); mData.add(new YetLanguage("Scala", "Scala 是一门多范式(multi-paradigm)的编程语言", R.drawable.scala)); mData.add(new YetLanguage("Swift", "Swift 是开发 Mac APP 和 iOS APP 的语言", R.drawable.swift)); mData.add(new YetLanguage("TypeScript", "TypeScript 是一种由微软开发的自由和开源的编程语言", R.drawable.typescript)); //创建一个 YetAdapter YetAdapter yetAdapter = new YetAdapter((LinkedList<YetLanguage>) mData,getApplicationContext()); listView.setAdapter(yetAdapter); listView.setOnItemClickListener(this); } @Override public void onItemClick(AdapterView<?> parent, View view, int position, long id) { Toast.makeText(getApplicationContext(),"你点击了第" + position + "项",Toast.LENGTH_SHORT).show(); } }
添加表头和表尾的方法还是比较简单的,但有一点要注意
- 添加表头表尾后,positon 是从表头开始算的,也就是说添加的第一个数据本来的 postion 是 0,但是此时却变成了 1,因为表头也算
列表从底部开始显示 android:stackFromBottom
如果想让列表显示你列表的最下面的话,那么可以设置属性 android:stackFromBottom="true"
-
复用上面的 demo
-
修改
activity_main.xml文件<?xml version="1.0" encoding="utf-8" ?> <LinearLayout xmlns:android="http://schemas.android.com/apk/res/android" xmlns:tools="http://schemas.android.com/tools" android:layout_width="match_parent" android:layout_height="match_parent" android:padding="8dp" android:orientation="vertical" > <ListView android:id="@+id/listview" android:layout_width="match_parent" android:layout_height="200dp" android:stackFromBottom="true" /> </LinearLayout>
设置点击颜色 cacheColorHint
如果你为 ListView 设置了一个图片作为 Background 的话,当拖动或者点击 listView 空白位置会发现 item 都变成黑色了,这是时候我们可以通过这个
android:cacheColorHint="#00000000"
将颜色设置为透明: #00000000
隐藏滑动条
可以通过设置
android:scrollbars="none"
或者调用
setVerticalScrollBarEnabled(true);