Android ImageView 图像视图
上一章节,我们使用属性 android:src 为 ImageView 设置了图片,但是,我们知道, ImageView 继承自 View,那么就一定会有 android:background 属性
这两个属性都可以设置图片,但是它们之间是有区别的
- background 通常指的都是 背景, 而 src 指的是 内容
- 当使用 src 填入图片时, 是按照图片大小直接填 ,不会进行拉伸。而使用 background 填入图片,则是会根据 ImageView 给定的宽度来进行 拉伸
我们写一个范例来演示下这种区别
-
创建一个 空的 Android 项目
cn.twle.android.ImageView -
下载 /static/i/android/plane.png 并放到
res/drawable目录下 -
修改
activity_main.xml添加几个<ImageView><?xml version="1.0" encoding="utf-8" ?> <LinearLayout xmlns:android="http://schemas.android.com/apk/res/android" android:layout_width="match_parent" android:layout_height="match_parent" android:orientation="vertical" > <ImageView android:layout_width="wrap_content" android:layout_height="wrap_content" android:background="@drawable/plane" /> <ImageView android:id="@id+/plane2" android:layout_width="128dp" android:layout_height="wrap_content" android:background="@drawable/plane" /> <ImageView android:layout_width="wrap_content" android:layout_height="wrap_content" android:src="@drawable/plane" /> <ImageView android:layout_width="128dp" android:layout_height="wrap_content" android:src="@drawable/plane" /> </LinearLayout>
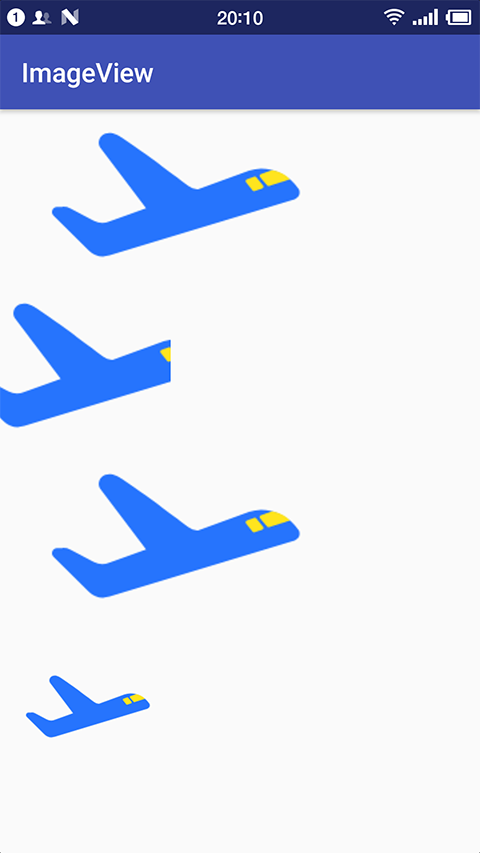
运行 demo 效果如下

- 宽高都是
wrap_content那就一样,是原图大小 - 当我们固定了宽或者高的话,差别就显而易见了,blackground 完全填充了整个 ImageView,而 src 依旧是那么大
- 如果同时设置了 width 和 height 的话,blackground 依旧填充,但是,src 的大小可能发生改变,而且会居中显示
解决 anndroid:blackground 属性拉伸导致图片变形的方法
从上面的范例中第二张图可以看到,当 ImageView 的宽高不匹配图片的时候,使用 android:background 属性会让图片拉伸变形,那有没有办法解决这么问题呢?
答案肯定是有的,可以有两种方式来解决这个问题
-
如果
ImageView是动态加载的,那么可以使用下面的 Java 代码重新设置ImageView大小LinearLayout.LayoutParams layoutParam = new LinearLayout.LayoutParams(48, 48); layout.addView(plane2, layoutParam);
-
如果是通过 XML 布局引入的
ImageView,则可以通过drawable的Bitmap资源文件来完成,然后 blackground 属性设置为该文件plane_bg.xml
<bitmap
    xmlns:android="http://schemas.android.com/apk/res/android"
    android:id="@+id/plane_bg"
    android:gravity="center"
    android:src="@drawable/plane"
    android:tileMode="disabled" >
</bitmap>
android:titleMode属性是平铺,就是我们 windows 设置背景时候的平铺,多个小图标铺满整个屏幕,disabled 就是把他给禁止了调用方法
动态:
plane.setBacklgroundResource(R.drawable.plane_bg);
静态
android:background = "@drawable/plane_bg"
我们用第二种方法来试一下
-
复用上面的 demo 代码
-
在
res/drawable目录下新建一个资源文件 plane_bg.xml 并添加以下内容<bitmap xmlns:android="http://schemas.android.com/apk/res/android" android:id="@+id/plane_bg" android:gravity="center" android:src="@drawable/plane" android:tileMode="disabled" > </bitmap>
-
修改
activity_main.xml设置第二个ImageView的属性android:background = "@drawable/plane_bg"<?xml version="1.0" encoding="utf-8" ?> <LinearLayout xmlns:android="http://schemas.android.com/apk/res/android" android:layout_width="match_parent" android:layout_height="match_parent" android:orientation="vertical" > <ImageView android:layout_width="wrap_content" android:layout_height="wrap_content" android:background="@drawable/plane" /> <ImageView android:id="@+id/plane2" android:layout_width="128dp" android:layout_height="wrap_content" android:background = "@drawable/plane_bg" /> <ImageView android:layout_width="wrap_content" android:layout_height="wrap_content" android:src="@drawable/plane" /> <ImageView android:layout_width="128dp" android:layout_height="wrap_content" android:src="@drawable/plane" /> </LinearLayout>
运行 demo 效果如下
设置透明度的问题
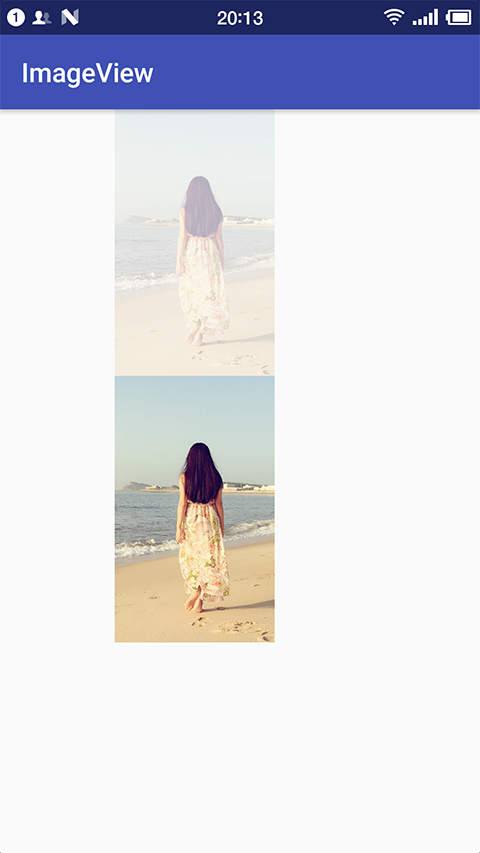
属性 android:alpha 用于设置 ImageView 的透明度,只有 src 时才有效
我们写一个 demo 来演示下这个属性
-
创建一个 空的 Android 项目
cn.twle.android.ImageView -
下载 /static/i/meimei.jpg 并放到
res/drawable目录下 -
修改
activity_main.xml添加几个<ImageView><?xml version="1.0" encoding="utf-8" ?> <LinearLayout xmlns:android="http://schemas.android.com/apk/res/android" android:layout_width="match_parent" android:layout_height="match_parent" android:orientation="vertical" > <ImageView android:layout_width="wrap_content" android:layout_height="200dp" android:alpha = "0.3" android:src="@drawable/meimei" /> <ImageView android:layout_width="wrap_content" android:layout_height="200dp" android:src="@drawable/meimei" /> </LinearLayout>
运行 demo 效果如下
android:src 和 android:background 结合
大家对罗永浩的可能非常熟悉,不知道大家对锤子手机熟悉不? 哦,对了,我现在调试的真机就是 锤子2 红色版
锤子手机最经典的图片,莫过于豆腐块桌面了 (百度搜一下)
如果我们想实现这样的效果,要怎么做呢?
看上去这就是一个简单的网格布局或者 GridView,每个 item 都是一个 ImageView
但是,不知道你有没有发现,背景都是黑色的豆腐块,图标却是各式各样的形状
要实现这样的 ImageView,就需要 android:src 和 android:background 一起使用了
我们写一个范例来简单的实现这样的效果吧
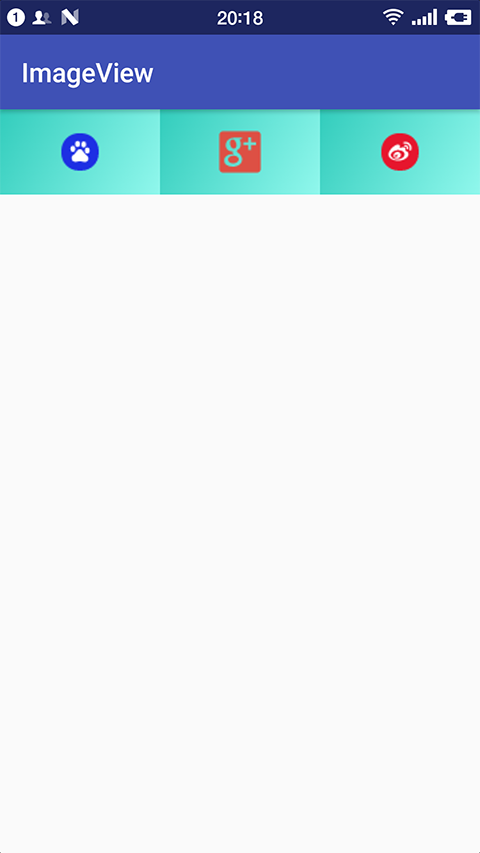
-
创建一个 空的 Android 项目
cn.twle.android.ImageView -
下载解压 /static/i/android/imgview_all.zip 并把所有的图片都放到
res/drawable目录下 -
在
res/drawable目录下新建一个gdbg.xml用来做背景,这是一个渐变<?xml version="1.0" encoding="utf-8" ?> <shape xmlns:android="http://schemas.android.com/apk/res/android" android:shape="rectangle"> <gradient android:angle="135" android:endColor="#32CCBC" android:startColor="#90F7EC" android:type="linear"/> <padding android:left="16dp" android:right="16dp" android:top="16dp" android:bottom="16dp" /> </shape>
-
修改
activity_main.xml添加几个<ImageView><?xml version="1.0" encoding="utf-8" ?> <LinearLayout xmlns:android="http://schemas.android.com/apk/res/android" android:layout_width="match_parent" android:layout_height="match_parent" android:orientation="horizontal" > <ImageView android:layout_width="wrap_content" android:layout_height="wrap_content" android:layout_weight="1" android:background="@drawable/gdbg" android:src="@drawable/baidu" /> <ImageView android:layout_width="wrap_content" android:layout_height="wrap_content" android:layout_weight="1" android:background="@drawable/gdbg" android:src="@drawable/google" /> <ImageView android:layout_width="wrap_content" android:layout_height="wrap_content" android:layout_weight="1" android:background="@drawable/gdbg" android:src="@drawable/weibo" /> </LinearLayout>
Java 代码中设置 blackground 和 src 属性
前景(对应 src 属性)
setImageDrawable();
背景(对应 background 属性)
setBackgroundDrawable();
参考文档
- 官方API ImageView