Android DrawerLayout 侧滑菜单
侧滑菜单很常见,比如,打开 QQ,点击左上角的头像,就是一个侧滑菜单了
Android 在 v4 包中引入了官方的侧滑控件 DrawerLayout 让我们可以轻易实现侧滑菜单效果
DrawerLayout
DrawerLayout 在 android.support.v4.widget 命名空间下,可以使用 XML 来创建
<android.support.v4.widget.DrawerLayout xmlns:android="http://schemas.android.com/apk/res/android"
    android:id="@+id/drawer_layout"
    android:layout_width="match_parent"
    android:layout_height="match_parent">

    <FrameLayout
        android:id="@+id/ly_content"
        android:layout_width="match_parent"
        android:layout_height="match_parent" />

    <ListView
        android:id="@+id/list_left_drawer"
        android:layout_width="180dp"
        android:layout_height="match_parent"
        android:layout_gravity="start"
        android:background="#080808"
        android:choiceMode="singleChoice"
        android:divider="#FFFFFF"
        android:dividerHeight="1dp" />

</android.support.v4.widget.DrawerLayout>
注意事项
-
主内容视图一定要是 DrawerLayout 的第一个子视图,比如
@+id/ly_content -
主内容视图宽度和高度需要
match_parent -
必须 显示 指定侧滑视图的
android:layout_gravity属性- android:layout_gravity = "start" 时,从左向右滑出菜单
- android:layout_gravity = "end" 时,从右向左滑出菜单
不推荐使用
left和right -
侧滑视图的宽度以 dp 为单位,不建议超过 320dp (为了总能看到一些主内容视图)
-
设置侧滑事件
mDrawerLayout.setDrawerListener(DrawerLayout.DrawerListener);
-
可以结合
Toolbar使用当用户点击Toolbar上的应用图标,弹出侧滑菜单
范例
下面我们使用 DrawerLayout 创建一个单向的侧滑菜单
-
创建一个 空的 Android 项目
cn.twle.android.DrawerLayout -
修改
activity_main.xml,最外层要是 DrawerLayout<android.support.v4.widget.DrawerLayout xmlns:android="http://schemas.android.com/apk/res/android" android:id="@+id/drawer_layout" android:layout_width="match_parent" android:layout_height="match_parent"> <FrameLayout android:id="@+id/ly_content" android:layout_width="match_parent" android:layout_height="match_parent" /> <ListView android:id="@+id/list_left_drawer" android:layout_width="180dp" android:layout_height="match_parent" android:layout_gravity="start" android:background="#dddddd" android:choiceMode="singleChoice" android:divider="#eeeeee" android:dividerHeight="1dp" /> </android.support.v4.widget.DrawerLayout>
-
在
res/layout目录下新建一个main_content.xml布局用于显示主要的内容<?xml version="1.0" encoding="utf-8"?> <RelativeLayout xmlns:android="http://schemas.android.com/apk/res/android" android:layout_width="match_parent" android:layout_height="match_parent" android:orientation="vertical"> <TextView android:id="@+id/tv_content" android:layout_width="wrap_content" android:layout_height="wrap_content" android:layout_centerInParent="true"/> </RelativeLayout>
-
在
MainActivity.java同目录下新建一个MainContentFragment.javapackage cn.twle.android.drawerlayout; import android.os.Bundle; import android.support.v4.app.Fragment; import android.view.LayoutInflater; import android.view.View; import android.view.ViewGroup; import android.widget.TextView; public class MainContentFragment extends Fragment { private TextView tv_content; @Override public View onCreateView(LayoutInflater inflater, ViewGroup container, Bundle savedInstanceState) { View view = inflater.inflate(R.layout.main_content, container, false); tv_content = (TextView) view.findViewById(R.id.tv_content); String text = getArguments().getString("text"); tv_content.setText(text); return view; } }
-
最后修改
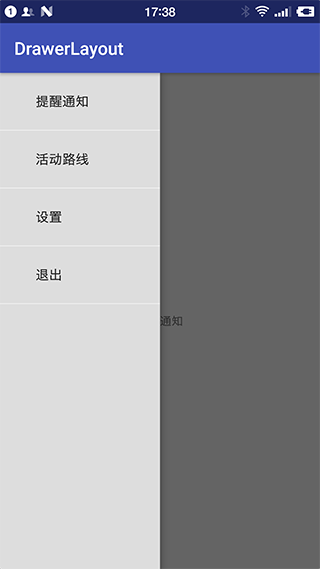
MainActivity.javapackage cn.twle.android.drawerlayout; import android.os.Bundle; import android.support.v4.app.FragmentManager; import android.support.v4.widget.DrawerLayout; import android.support.v7.app.AppCompatActivity; import android.view.View; import android.widget.AdapterView; import android.widget.ArrayAdapter; import android.widget.ListView; public class MainActivity extends AppCompatActivity implements AdapterView.OnItemClickListener{ private DrawerLayout drawer_layout; private ListView list_left_drawer; private ArrayAdapter<String> adapter = null; @Override protected void onCreate(Bundle savedInstanceState) { super.onCreate(savedInstanceState); setContentView(R.layout.activity_main); drawer_layout = (DrawerLayout) findViewById(R.id.drawer_layout); list_left_drawer = (ListView) findViewById(R.id.list_left_drawer); String[] left_menu = {"提醒通知","活动路线","设置","退出"}; adapter = new ArrayAdapter<String> (this,android.R.layout.simple_expandable_list_item_1,left_menu); list_left_drawer.setAdapter(adapter); list_left_drawer.setOnItemClickListener(this); } @Override public void onItemClick(AdapterView<?> parent, View view, int position, long id) { MainContentFragment contentFragment = new MainContentFragment(); Bundle args = new Bundle(); args.putString("text", adapter.getItem(position)); contentFragment.setArguments(args); FragmentManager fm = getSupportFragmentManager(); fm.beginTransaction().replace(R.id.ly_content,contentFragment).commit(); drawer_layout.closeDrawer(list_left_drawer); } }
代码不要太简单,我都觉得没啥好说明的了
参考文档
-
官方文档: DrawerLayout
-
弘扬大神写过一篇: Android DrawerLayout 高仿 QQ5.2 双向侧滑菜单