Android ConstraintLayout 约束布局
Android ConstraintLayout (约束布局) 是 Android Studio 2.3+ 创建 activity_main.xml 的默认布局方式
在上一章节中我们学习了 Android ConstraintLayout 中的 比例 ( Ratio) 属性,本章我们就来学习 链条 ( Chains )
链条 ( Chains )
链条在同一个方向上( 水平或者垂直 ) 提供一个类似群组的统一表现,另一个轴可以单独控制
创建链条 ( Creating a chain )
如果一组 UI 控件通过双向连接 ( 见图,显示最小的链,带有两个小部件 ),则将其视为链条
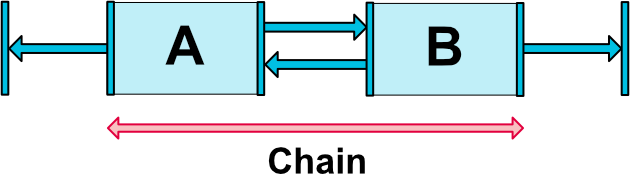
链条头 ( Chain heads )
链条由在链的第一个元素 ( 链的 头) 上设置的属性控制
- 水平链最左边的 View 是头
- 垂直链最顶端的 View 是头

链上的 margin ( Margins in chains )
如果链上的某个元素指定了边距,则将被考虑在内
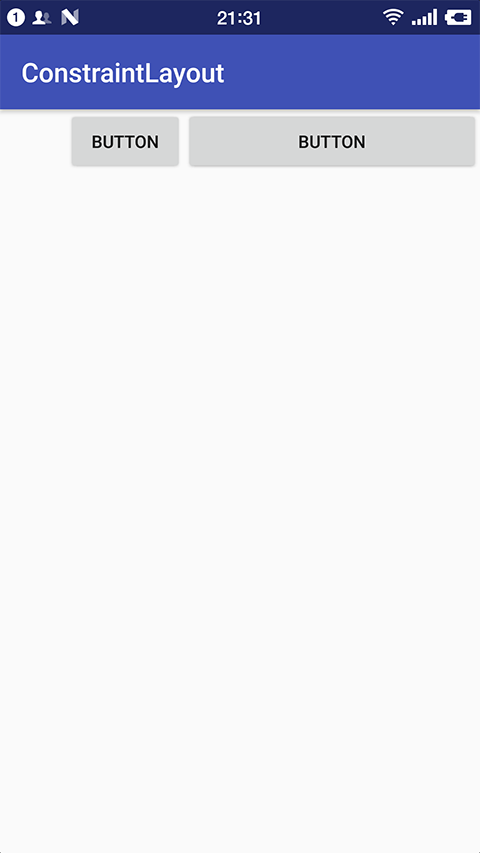
我们写一个 demo 演示下当链上存在 margin 的情况
-
创建一个 空的 Android 项目
cn.twle.android.ConstraintLayout -
修改
activity_main.xml为以下内容<?xml version="1.0" encoding="utf-8" ?> <android.support.constraint.ConstraintLayout xmlns:android="http://schemas.android.com/apk/res/android" xmlns:app="http://schemas.android.com/apk/res-auto" android:layout_width="match_parent" android:layout_height="match_parent"> <Button android:id="@+id/buttonA" android:layout_width="wrap_content" android:layout_height="wrap_content" android:layout_marginLeft="50dp" android:text="Button" app:layout_constraintLeft_toLeftOf="parent" app:layout_constraintRight_toLeftOf="@+id/buttonB"/> <Button android:id="@+id/buttonB" android:layout_width="wrap_content" android:layout_height="wrap_content" android:text="Button" app:layout_constraintLeft_toRightOf="@+id/buttonA" app:layout_constraintRight_toRightOf="parent"/> </android.support.constraint.ConstraintLayout>
上面的代码 app:layout_constraintRight_toLeftOf="@+id/buttonB" 和 app:layout_constraintLeft_toRightOf="@+id/buttonA" 创建了一个链条
然后它们两个成了一个整体,所以链条左边设置 app:layout_constraintLeft_toLeftOf="parent" 使得和父控件左对齐,右边设置 app:layout_constraintRight_toRightOf="parent" 使得和父控件右对齐,
这样整个链条就居中了,最后对左控件设置了 margin,相当于整个链条左边有了 margin
运行范例,显示如下

链条样式 ( Chain Style )
当在链的第一个元素上设置属性 layout_constraintHorizontal_chainStyle 或 layout_constraintVertical_chainStyle 时,链的行为将根据指定的样式 ( 默认为 CHAIN_SPREAD) 而更改

这两个属性的值可以是以下之一
| 值 | 说明 |
|---|---|
| CHAIN_SPREAD | 元素将被展开(默认样式) 加权链 - 在 spread 模式下,如果某些小部件设置为 MATCH_CONSTRAINT,则它们将拆分可用空间 |
| CHAIN_SPREAD_INSIDE | 类似,但链的端点将不会扩展 |
| CHAIN_PACKED | 链的元素将被打包在一起。子控件的水平或垂直偏差属性将影响包装元素的定位 |
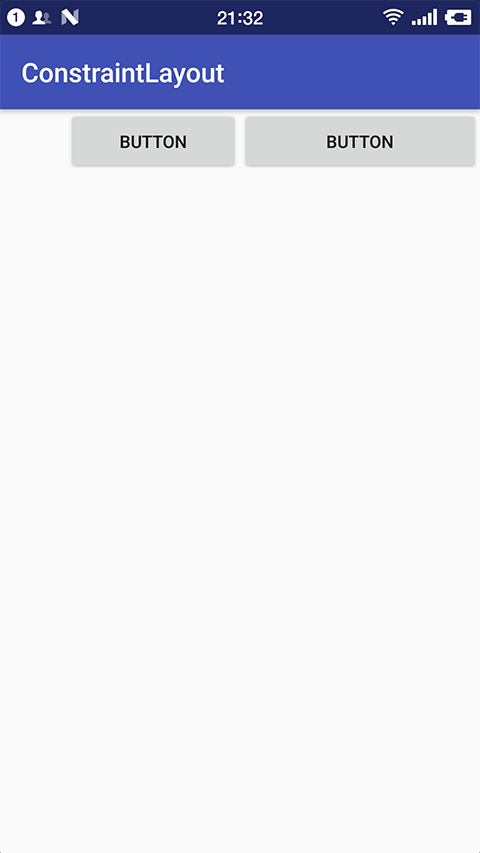
我们写一个 加权链 的范例来演示下这两个属性
-
创建一个 空的 Android 项目
cn.twle.android.ConstraintLayout -
修改
activity_main.xml为以下内容<?xml version="1.0" encoding="utf-8" ?> <android.support.constraint.ConstraintLayout xmlns:android="http://schemas.android.com/apk/res/android" xmlns:app="http://schemas.android.com/apk/res-auto" android:layout_width="match_parent" android:layout_height="match_parent"> <Button android:id="@+id/buttonA" android:layout_width="wrap_content" android:layout_height="wrap_content" android:layout_marginLeft="50dp" android:text="Button" app:layout_constraintHorizontal_chainStyle="spread" app:layout_constraintLeft_toLeftOf="parent" app:layout_constraintRight_toLeftOf="@+id/buttonB"/> <Button android:id="@+id/buttonB" android:layout_width="0dp" android:layout_height="wrap_content" android:text="Button" app:layout_constraintLeft_toRightOf="@+id/buttonA" app:layout_constraintRight_toRightOf="parent"/> </android.support.constraint.ConstraintLayout>
运行范例,显示如下
加权链 ( Weighted chains )
和 LinearLayout 的 weight 类似,链的默认行为是在可用空间中平均分配元素
如果一个或多个元素使用 MATCH_CONSTRAINT,它们将使用剩余的空白空间 ( 在它们之间相等 )
属性 layout_constraintHorizontal_weight 和 layout_constraintVertical_weight 将决定这些都设置了 MATCH_CONSTRAINT 的 View 如何分配空间
例如,在包含使用 MATCH_CONSTRAINT 的两个元素的链上,第一个元素使用权重为 2,第二个元素的权重为 1,第一个元素占用的空间将是第二个元素的两倍
我们写一个范例来演示下这两个属性
-
创建一个 空的 Android 项目
cn.twle.android.ConstraintLayout -
修改
activity_main.xml为以下内容<?xml version="1.0" encoding="utf-8" ?> <android.support.constraint.ConstraintLayout xmlns:android="http://schemas.android.com/apk/res/android" xmlns:app="http://schemas.android.com/apk/res-auto" android:layout_width="match_parent" android:layout_height="match_parent"> <Button android:id="@+id/buttonA" android:layout_width="0dp" android:layout_height="wrap_content" android:layout_marginLeft="50dp" android:text="Button" app:layout_constraintHorizontal_chainStyle="spread" app:layout_constraintLeft_toLeftOf="parent" app:layout_constraintRight_toLeftOf="@+id/buttonB"/> <Button android:id="@+id/buttonB" android:layout_width="0dp" android:layout_height="wrap_content" android:text="Button" app:layout_constraintLeft_toRightOf="@+id/buttonA" app:layout_constraintRight_toRightOf="parent"/> </android.support.constraint.ConstraintLayout>
运行范例,显示如下
可以看到虽然它们的 weight 相等,但是 margin 是被计算在约束里的,所以左边的按钮宽度比右边的小