Android ConstraintLayout 约束布局
Android ConstraintLayout (约束布局) 是 Android Studio 2.3+ 创建 activity_main.xml 的默认布局方式
在上一章节中我们学习了 Android ConstraintLayout 中的 对可见性的处理 ( Visibility behavior ) 约束布局,本章我们就来学习 尺寸约束 ( Dimensions constraints )
尺寸约束 ( Dimensions constraints )
ConstraintLayout 的最小尺寸
可以为 ConstraintLayout 自身定义最小的尺寸,它会在 ConstraintLayout 为 wrap_conent 时起作用
| 属性 | 说明 |
|---|---|
| android:minWidth | 设置布局的最小宽度 |
| android:minHeight | 设置布局的最小高度 |
| android:maxWidth | 设置布局的最大宽度 |
| android:maxHeight | 设置布局的最大高度 |
当 ConstraintLayout 的尺寸设置为 wrap_content 时,会自动启用设置的最小和最大尺寸
控件尺寸约束 ( Widgets dimension constraints )
UI 控件的宽高有三种设置方式
- 确定尺寸
- wrap_content
0dp,就是MATCH_CONSTRAINT
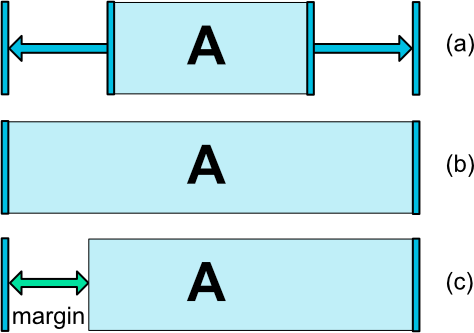
前两个以与其它布局类似的方式工作,最后一个将通过匹配设置的约束来调整窗口小部件(参见上图,(a) 是 wrap_content,(b) 是0dp )
如果设定了 margin ,则会在计算中考虑它们 (上图,(c) 中为 0dp)
有些人可能有疑问,为什么不用 MATCH_PARENT 了
因为,
MATCH_PARENT在ConstraintLayout不再被推荐了,可以通过使用MATCH_CONSTRAINT加上相应的 左/右或顶部/底部约束条件来定义 "parent"
范例
我们来写一个 demo 演示这三种设置方式吧
-
创建一个 空的 Android 项目
cn.twle.android.ConstraintLayout -
修改
activity_main.xml为以下内容<?xml version="1.0" encoding="utf-8" ?> <android.support.constraint.ConstraintLayout xmlns:android="http://schemas.android.com/apk/res/android" xmlns:app="http://schemas.android.com/apk/res-auto" android:layout_width="match_parent" android:layout_height="match_parent"> <Button android:id="@+id/button" android:layout_width="200dp" android:layout_height="100dp" android:text="Button" app:layout_constraintLeft_toLeftOf="parent" app:layout_constraintTop_toTopOf="parent"/> <Button android:id="@+id/button10" android:layout_width="wrap_content" android:layout_height="wrap_content" android:text="Button" app:layout_constraintLeft_toLeftOf="@+id/button" app:layout_constraintRight_toRightOf="@+id/button" app:layout_constraintTop_toBottomOf="@+id/button"/> <Button android:id="@+id/button11" android:layout_width="0dp" android:layout_height="wrap_content" android:text="Button" app:layout_constraintLeft_toLeftOf="@+id/button10" app:layout_constraintRight_toRightOf="@+id/button10" app:layout_constraintTop_toBottomOf="@+id/button10"/> </android.support.constraint.ConstraintLayout>
运行范例,显示结果如下
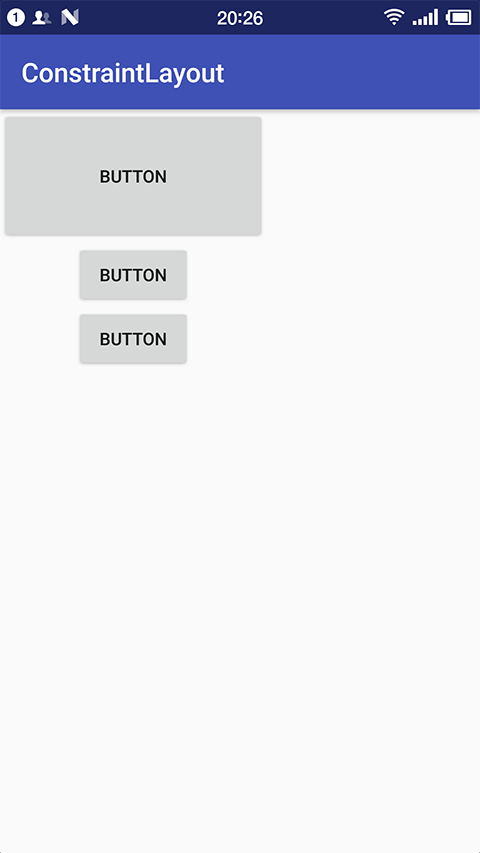
咦,不是说 0dp 等于 MATCH_CONSTRAINT ,应该是撑满屏幕的呀
等等,这个 MATCH_CONSTRAINT 属性 match 的是约束
也就是说,在上面的范例中,第三个按钮的约束是第二个按钮,所以它的宽度设置为 MATCH_CONSTRAINT 时,是和它的约束按钮,即第二个按钮一样宽
注意: 竖直方向上没有约束,所以不能使用 MATCH_CONSTRAINT 属性
范例 2
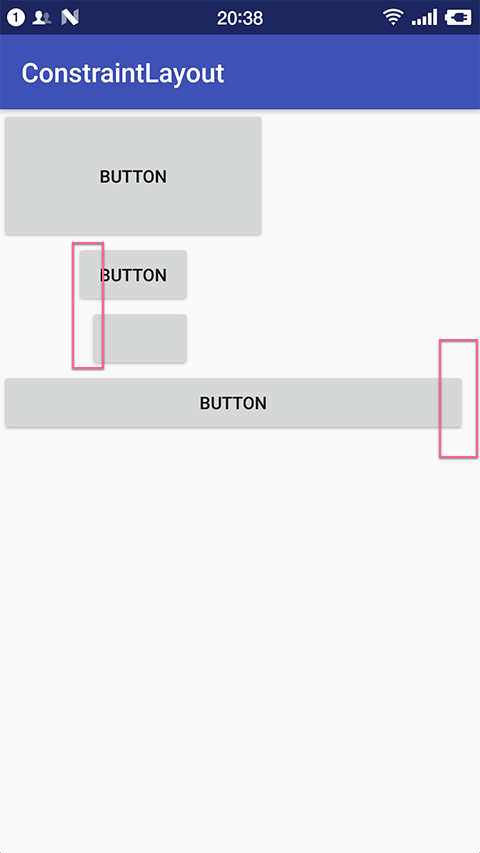
我们仅将将第三个按钮相应的属性修改为
app:layout_constraintLeft_toLeftOf="parent"
app:layout_constraintRight_toRightOf="parent"
那么它的宽度会撑满屏幕
运行一下,看看

范例 3
我们再改改,将 activity_main.xml 替换为以下内容
<?xml version="1.0" encoding="utf-8" ?>
<android.support.constraint.ConstraintLayout
    xmlns:android="http://schemas.android.com/apk/res/android"
    xmlns:app="http://schemas.android.com/apk/res-auto"
    android:layout_width="match_parent"
    android:layout_height="match_parent">

    <Button
        android:id="@+id/button"
        android:layout_width="200dp"
        android:layout_height="100dp"
        android:text="Button"
        app:layout_constraintLeft_toLeftOf="parent"
        app:layout_constraintTop_toTopOf="parent"/>

    <Button
        android:id="@+id/button10"
        android:layout_width="wrap_content"
        android:layout_height="wrap_content"
        android:text="Button"
        app:layout_constraintLeft_toLeftOf="@+id/button"
        app:layout_constraintRight_toRightOf="@+id/button"
        app:layout_constraintTop_toBottomOf="@+id/button"/>


    <Button
        android:id="@+id/button12"
        android:layout_width="0dp"
        android:layout_height="wrap_content"
        android:layout_marginLeft="10dp"
        app:layout_constraintLeft_toLeftOf="@id/button10"
        app:layout_constraintRight_toRightOf="@id/button10"
        app:layout_constraintTop_toBottomOf="@id/button10"/>

    <Button
        android:id="@+id/button11"
        android:layout_width="0dp"
        android:layout_height="wrap_content"
        android:layout_marginRight="10dp"
        android:text="Button"
        app:layout_constraintLeft_toLeftOf="parent"
        app:layout_constraintRight_toRightOf="parent"
        app:layout_constraintTop_toBottomOf="@+id/button12"/>

</android.support.constraint.ConstraintLayout>
运行一下,看看
所以,只有一句话 约束要和 0dp 的 方向一致。否则无效